Mounting a drive in Linux, especially Debian, can seem intimidating at first. But once you understand the steps, it becomes a seamless way to ensure your drives are automatically mounted on boot. In this guide, I’ll walk you through mounting a drive using the /etc/fstab file.
Why Use /etc/fstab?
The /etc/fstab file is a configuration file that tells your system which drives to mount and where to mount them during the boot process. By adding your drive to this file, you ensure it’s always available without manually mounting it every time.
Step-by-Step Guide
1. Identify Your Drive
The first step is to find the drive you want to mount. Open a terminal and run:
lsblk
This will display all available drives and partitions. For example:
NAME   MAJ:MIN RM  SIZE RO TYPE MOUNTPOINT
sda      8:0    0  500G  0 disk
├─sda1   8:1    0  499G  0 part /
└─sda2   8:2    0    1G  0 part [SWAP]
sdb      8:16   0  100G  0 disk
└─sdb1   8:17   0  100G  0 part
From this, let’s assume /dev/sdb1 is the drive you want to mount.
2. Get the UUID
Using the device name can cause issues if it changes, so it’s better to use the UUID. To get it, run:
sudo blkid /dev/sdb1
You’ll see output like this:
/dev/sdb1: UUID="1234-5678-90AB-CDEF" TYPE="ext4"
Copy the UUID for the next steps.
3. Create a Mount Point
Next, create a directory where you want to mount the drive. This is where you’ll access its files.
sudo mkdir -p /mnt/mydrive
Feel free to replace /mnt/mydrive with your preferred path.
4. Edit /etc/fstab
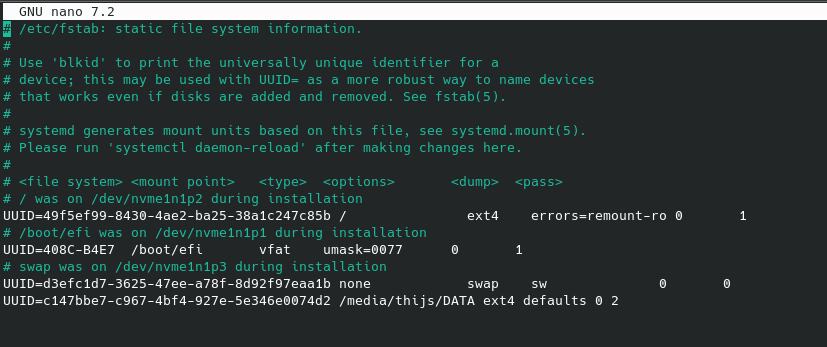
Now it’s time to configure /etc/fstab. Open it in your favorite text editor:
sudo nano /etc/fstab
Add a new line at the bottom of the file:
UUID=1234-5678-90AB-CDEF /mnt/mydrive ext4 defaults 0 2
Here’s what each part means:
UUID=1234-5678-90AB-CDEF: The unique identifier for your drive./mnt/mydrive: The directory where the drive will be mounted.ext4: The filesystem type. Replace this with the actual type (e.g.,ext4,ntfs,vfat, etc.).defaults: Standard mount options.0: Whether to back up the drive with thedumpcommand (usually0).2: The order for filesystem checks during boot (set1for root,2for others).
5. Test the Configuration
Before rebooting, test your changes to make sure everything works:
sudo mount -a
If there are no errors, your configuration is correct.
6. Verify the Mount
To confirm the drive is mounted, run:
df -h
You should see an entry for your drive and its mount point.
Advanced Tips
- NTFS Drives: If your drive is NTFS, ensure the
ntfs-3gpackage is installed:sudo apt install ntfs-3gThen replaceext4withntfs-3gin the/etc/fstabentry. - FAT32 or exFAT Drives: For FAT-based filesystems, install these tools:
sudo apt install dosfstools exfatprogsUsevfatfor FAT32 orexfatfor exFAT in/etc/fstab.
Common Issues
- Device Name Changes: If you use
/dev/sdXinstead of UUID and the device name changes, the mount will fail. Always use UUID or labels. - Filesystem Not Supported: If the filesystem isn’t supported, install the necessary tools (e.g.,
ntfs-3g,exfatprogs). - Permissions Problems: Ensure the mount point has the correct permissions for your needs. For example:
sudo chmod 755 /mnt/mydrive
Conclusion
By adding your drive to /etc/fstab, you save time and ensure consistency every time your system boots. Whether it’s a secondary hard drive, an external SSD, or a network drive, this method is a reliable way to manage mounts on Debian.


